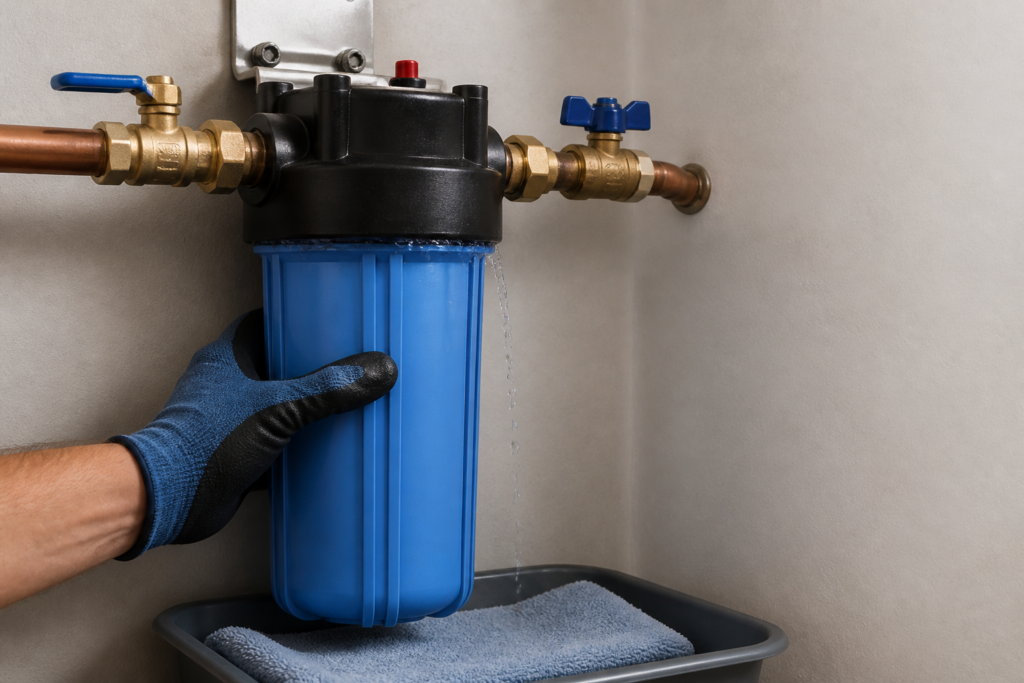




A whole-house water filter housing that starts leaking after a cartridge change usually has a problem at the seal, seating surface, threads, cartridge fit, relief assembly, or housing itself. The O-ring may be displaced or damaged, debris may be trapped at the seal, the canister may be misaligned, or pressure may be exposing a crack. The leak location and the moment it begins help distinguish these possibilities.
Do not try to tighten or remove the canister while it is under pressure. If the system has a clearly labeled bypass that you can operate according to the manufacturer’s instructions, place it in bypass. Otherwise, use a familiar, safely accessible interior water shutoff. Do not force a stiff valve or guess at an unfamiliar control.
Stop the Water Before Inspecting the Housing
A filter housing is a pressure-bearing part of the home’s water supply. Even a slow drip means the assembly should be isolated before anyone touches the canister, cap, fittings, or relief button.
Once the incoming water is isolated, residual pressure should be relieved only through a normal downstream fixture or a pressure-relief method approved for that exact filter. Follow the manufacturer’s labeling and instructions. Do not loosen a fitting or crack the housing open as a way to vent pressure.
Keep people away if water is approaching electrical equipment. Do not stand in water or touch wet switches, devices, wiring, or panels. If the leak cannot be isolated without entering a wet area or operating an unfamiliar control, stop and request qualified help.
After flow has stopped, a container or absorbent towels can protect the surrounding dry floor while you document the leak. They are not a substitute for isolating the water, and the filter should not be returned to normal service until the leak source is understood.
The Leak Location Is an Important Clue
Drying the outside of an isolated housing can make the starting point easier to see. Do not disassemble the filter just to improve the view. A photograph of the first wet point can be more useful than a picture taken after water has run down the entire canister.
Water Around the Housing-to-Head Seam
A circular wet line where the canister meets the filter head often shifts attention toward the main O-ring, the sealing groove, the rim of the housing, alignment, or threads. Water can travel around the circumference before dripping from the lowest point, so the visible drip may not be where the seal first failed.
The seam pattern does not prove that the O-ring simply needs more tightening. A twisted seal, a damaged groove, debris, misalignment, or a cracked rim can all create a similar leak. Extra force can pinch the seal or damage the housing.
Water at the Pressure-Relief Button or Plug
Some filter heads have a pressure-relief button, vent, or plug. If the first moisture forms there rather than at the canister seam, the small seal or internal relief component may be involved. The manufacturer may specify a service procedure or replacement part for that assembly.
Do not press an unidentified control while the unit is leaking or use it to release pressure unless the manufacturer identifies it as the approved method for that model. A normal downstream fixture remains the safer general pressure-relief route after the water is isolated.
Water at an Inlet, Outlet, or Nearby Fitting
A fitting leak can appear to come from the housing after water runs along the head or pipe. Look from a safe distance for the highest visible wet point. Moisture at a threaded adapter, union, valve, bracket, or drain connection calls for a different repair than a canister seal.
Do not tighten a fitting while the system is pressurized. Excess force can transfer stress into a plastic filter head or crack an adapter that was previously sound.
Water Through the Canister Wall
A line of moisture through the body of the canister, around the rim, or from a visible hairline crack is more serious than an ordinary seal seep. A pressure-bearing housing with a suspected crack should remain isolated. Glue, epoxy, tape, or a surface patch is not a safe substitute for an approved replacement component.
Why the O-Ring May Leak After Service
The large O-ring creates the primary seal between the filter canister and head on many systems. It must be the correct size and material, rest evenly in its intended groove, and contact clean, undamaged sealing surfaces.
During a cartridge change, the O-ring can lift out of the groove, twist, stretch, collect grit, or become nicked. An older seal may also have flattened or hardened. Any of these conditions can leave a path for water when pressure returns.
A seal that looks intact is not automatically reusable. Small cuts, distortion, or loss of elasticity can be difficult to see. The correct replacement and any compatible lubricant depend on the exact manufacturer and model. Household grease, petroleum products, pipe dope, thread tape, or an O-ring that merely looks similar can damage materials or interfere with the seal.
A plumber servicing whole-house water filtration systems can verify the specified seal, inspect the groove and rim, and determine whether the sealing surfaces remain sound.
Debris, Alignment, and Threads Can Prevent an Even Seal
A small piece of sediment, old lubricant, hair, or damaged seal material can hold one part of the O-ring away from its sealing surface. The canister may appear tight while a narrow passage remains.
Misalignment creates a similar problem. A heavy filter housing needs to enter the head squarely. If the threads start at an angle, the canister can bind before the seal is compressed evenly. Cross-threading may damage the housing or head and can make future removal difficult.
The outside position of the canister does not reveal whether the threads are fully engaged or damaged. Do not use a longer handle, impact tool, or improvised leverage to force it into place. Manufacturer instructions determine how that exact housing should be assembled.
The Cartridge Itself Can Interfere With Seating
Cartridges that look similar can differ in length, diameter, end-cap shape, gasket design, flow direction, or center opening. An incorrect cartridge may prevent the canister from reaching its proper seated position. A cartridge that is tilted, not centered, or installed with a misplaced adapter can also hold the housing away from the head.
Packaging, model numbers, and the old cartridge can provide useful comparison evidence. Do not trim, compress, drill, or otherwise modify a cartridge to make the housing close. If the replacement cannot be confirmed for the exact system, keep the unit bypassed or isolated until compatibility is verified.
Homeowners who are still comparing filter types, treatment goals, and maintenance needs can review how to decide whether a home needs a water filtration system. Cartridge compatibility still has to be confirmed from the installed equipment’s specifications.
Overtightening Can Damage the Seal or Housing
More force does not always create a better seal. Overtightening can pinch or roll an O-ring, distort a plastic rim, damage threads, or place stress on the filter head and connected piping. A housing wrench may be intended primarily for loosening a canister rather than applying maximum closing force, depending on the manufacturer.
If the canister was difficult to start, stopped unevenly, or required unusual force during the cartridge change, tell the plumber before the assembly is disturbed. That history helps focus the inspection on threads, alignment, and rim condition.
A filter that leaks only when pressure returns may also have a component that was already weakened. The cartridge change can coincide with the failure without being the sole cause. A crack, degraded head, unsupported piping, or abnormal pressure can become visible only after the system is repressurized.
Useful Details to Record Without Reopening the Filter
Once the water is safely isolated, record observations that can guide the service visit:
- The exact point where water first appeared.
- Whether the leak began immediately when supply pressure returned or developed later.
- Whether it was a drip, a circular seam seep, a fine spray, or water through the canister wall.
- Whether the system is now bypassed or fully isolated.
- The filter brand and model shown on a readable label.
- The part number and dimensions printed on the new cartridge packaging.
- Whether the original O-ring was reused or replaced.
- Whether the canister seemed misaligned or unusually difficult to seat.
- Any visible crack, distorted rim, damaged thread, loose bracket, or leaking fitting.
- Any recent change in household water pressure or pipe movement near the filter.
Photographs of the equipment label, cartridge packaging, and highest wet point can reduce guesswork. Do not remove guards, open the canister, or return pressure just to capture another image.
Streamline’s broader plumbing services in Alabaster may be relevant when the filter leak involves nearby valves, supply piping, pressure controls, or another connection outside the filtration unit.
What a Plumber May Inspect
A condition-based inspection begins with isolation and confirmed depressurization. The plumber can then identify the actual leak path rather than treating every wet canister as an O-ring problem.
Depending on the system, the inspection may include:
- Confirming the filter model, cartridge specification, and flow direction.
- Checking the O-ring size, condition, groove, and sealing surfaces.
- Looking for grit, old seal material, deformation, or scratches at the rim.
- Inspecting canister and head threads for cross-threading or damage.
- Checking whether the cartridge, spring, adapter, or centering feature is seated correctly.
- Examining the relief button, plug, drain, inlet, outlet, and nearby fittings.
- Looking for cracks, crazing, bracket movement, or piping stress.
- Measuring supply pressure when the equipment and conditions warrant it.
If reassembly is appropriate, the parts should be installed according to the exact manufacturer requirements and pressure restored gradually while the seam, fittings, and relief components are observed. A dry initial test does not justify ignoring a later recurring drip; the assembly needs to remain dry under normal operation.
A Seal Correction and a Housing Replacement Are Different Repairs
A sound canister and head may only need the correct cartridge, a specified O-ring, clean undamaged sealing surfaces, and proper alignment. A leaking relief component or fitting may support a focused replacement of that approved part.
Cracked pressure-bearing plastic, damaged threads, a distorted rim, or a compromised filter head calls for a different decision. Reusing a visibly damaged component or relying on a surface patch can allow the leak to return when pressure rises.
The wider system does not automatically need replacement because one housing leaked. The scope should follow the confirmed condition, availability of compatible approved parts, pipe support, and whether other pressure or installation problems contributed.
Arrange Water-Filtration Service in Alabaster
Keep the filter bypassed or isolated if it leaks after a cartridge change, and do not reopen it while pressure remains. When you contact Streamline Plumbing and Drain LLC, share the filter model, cartridge part number, exact leak location, timing, valve position, and any photos taken after safe isolation. Those details can help separate a seal or fit correction from a damaged housing, fitting, or pressure-related problem.